Development environment
Contents |
[edit] Overview
Primary target platform for implementing the building blocks of SimStadt workflows is Java 8 and above running on Windows 7 (64 Bit) and above. The preferred development environment in this project is Eclipse IDE 4.5 (Mars). The SimStadt platform consists of several software components or modules, each developed in its own Eclipse project. All projects reside in one Eclipse workspace. That way, dependencies between components can be maintained easily.
Code and test data will be shared by a Subversion repository. The standard layout of such a repository contains branches, tags, and trunk directories. While the main development takes place in trunk, branches and tags are used for branching and revisioning. There are two possibilities to work with this structure:
- Create several (Eclipse) projects on top of the repository root, each with its own development cycle, that is its own branches, tags and trunk directories.
- Create all projects under trunk and create the same tags and branches for all projects.
We go with the second approach, since the projects will be closely related.
Note, that collaborative software development requires sharing important settings and configurations at all three levels: IDE (what Java and Eclipse version to use), workspace (code style and more) and projects (dependencies, libraries, …). Follow the instruction below to achieve just that.
[edit] Install the Java Development Kit (JDK)
If not done yet, download and install the latest release of the Oracle JDK from http://www.oracle.com/technetwork/java/javase/downloads/index.html. Currently (November 2015) this is JDK 8u66 (Java SE Development Kit 8 aka JDK 1.8.0_66). While it is possible to run several Java versions side by side, just to avoid confusion, I recommend to uninstall previous Java releases beforehand, possibly requiring that you update any hard-coded paths that may exist in Java applications or IDEs.
Install the JDK, not just the client runtime (JRE) or the server JRE. While installing the JDK, you will be asked if you want to install a "public" JRE, too. This is probably a good idea, since Java browser plugins and and other standalone applications may require this JRE instead of the JDK.
[edit] Install Eclipse IDE for Java EE Developers
Current version is Eclipse 4.5.1 (Mars) downloadable from http://www.eclipse.org/downloads/. With Mars comes a new Eclipse installer as the recommended way of installation. However, packages and zip files for manual installation are still available. Anyway, it is important to choose package Eclipse IDE for Java EE Developers, *not* "'Eclipse IDE for Java Developers" or any other package, since these don't provide enhanced XML and Java tools required for our project.
In the Eclipse installation directory you find a file named "eclipse.ini". If Eclipse does not start up properly, you may have to modify memory settings in this file as explained here: http://help.eclipse.org/mars/index.jsp?topic=%2Forg.eclipse.platform.doc.user%2Ftasks%2Ftasks-2.htm.
Another useful modification of eclipse.ini is to to set the Java VM for running Eclipse explicitly instead of depending on the automatic built-in search mechanism. That way, the JRE/JDK for running Eclipse is the same as the one used to compile and run the projects. Moreover, it is same for each installation, a fact that often helps to identify and reproduce problems with the Eclipse IDE. See below the original eclipse.ini for Windows with two lines added on top to specify the Java VM explicitly:
-vm
C:\Program Files\Java\jdk1.8.0_66\jre\bin\javaw
-startup
plugins/org.eclipse.equinox.launcher_1.3.100.v20150511-1540.jar
--launcher.library
plugins/org.eclipse.equinox.launcher.win32.win32.x86_64_1.1.300.v20150602-1417
-product
org.eclipse.epp.package.jee.product
--launcher.defaultAction
openFile
--launcher.XXMaxPermSize
256M
-showsplash
org.eclipse.platform
--launcher.XXMaxPermSize
256m
--launcher.defaultAction
openFile
--launcher.appendVmargs
-vmargs
-Dosgi.requiredJavaVersion=1.7
-Xms256m
-Xmx1024m
For OS X the first two lines could be:
--vm
/Library/Java/JavaVirtualMachines/jdk1.8.0_66.jdk/Contents/Home/jre/bin
Important Notes:
- in file eclipse.ini, this statement must precede any definition of runtime parameters (in the working example above, it follows directly after
-startup) - it is important to start a new line after
-vm - do not forget to adapt this setting when deleting the referred JRE or moving it.
[edit] Configure Eclipse IDE
[edit] Workspace
When Eclipse starts up for the first time, it asks you to designate a workspace directory. This directory is used to store SimStadt settings and projects plus data, so choose a sensible location and name, e.g. "…/EigeneDokumente/SimStadt/EclipseWSSimstadt". If you have already a SimStadt workspace from a former Eclipse version, just choose this one - it will be upgraded. Note, that the workspace is used for SimStadt exclusively, meaning: do not reuse an existing workspace you may have already for other projects! (It is easy to switch between workspaces anytime.)
[edit] Check Eclipse Settings for Using Java 8
Step 1: Go to Window -> Preferences -> Java -> Installed JRE's to check if JDK 1.8.0 is already present. (The dialog headings "Installed JREs" and "Add JRE" are misleading since not only JREs can be definied, but also JDKs. While the JRE is the target environment for our applications, we have to compile "against" the JDK, since only the JDK contains special classes, e.g. needed to generate Java classes from XML Schemas). If JDK 1.8.0 is not present:
- Click "Add…"
- Choose "Standard VM" and click "Next >"
- Determine the directory where you installed JDK 1.8.0 via "Directory…"
- Clicking "Finish"
Step 2: Make JDK 1.8.0 the default if it isn't already by checking the appropriate box and press OK.
Step 3: Open Java -> Installed JREs -> Execution Environments in the Preferences dialog and select JDK 1.8.0 for the JavaSE-1.8 environment.
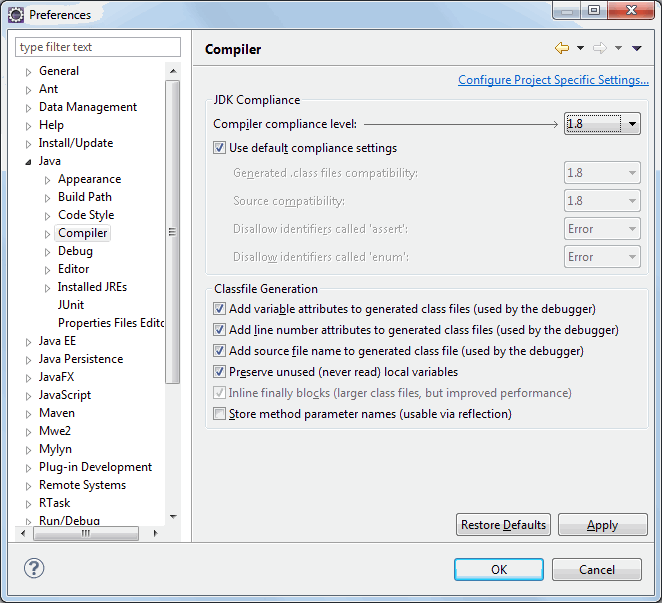
Step 4: Go to Window -> Preferences -> Java -> Compiler and, if necessary, switch "Compiler compliance level" from 1.7 to 1.8 as you can see below. From now on, Java sources can use the new syntax on the one hand, and produced class files will require a JRE/JDK 8 for execution on the other hand. This setting is the workspace default, meaning that new projects will work with it as well as all existing projects that do not have a special compiler version set.
[edit] Other general settings
Other general workspace settings like rules for automatic format and cleanup Java code are independent from your local installation. To get them, just import our common configuration file:
- Download and unzip File:SimStadtEclipsePreferences.epf.zip
- File -> Import -> General -> Preferences: From preference file SimStadtEclipsePreferences.epf (ensure "Import all" is checked).
You may inspect the settings under Window -> Preferences -> Java -> Code Style -> … and Window -> Preferences -> Java -> Editor -> Save Actions.
Please double check, that the default text file encoding under Window -> Preferences -> General -> Workspace is set to "Other: UTF-8"!
[edit] Perspectives
In the top right corner of the IDE you can specify what layouts of the Eclipse GUI (called perspective) you like to use. Here is a list of useful perspectives:
[edit] Subversion
Next, we have to configure the Subversion repository for sharing code and data within the project. It is assumed that the repository is accessible via http://localhost:1080. This address is your end of a secure SSH tunnel, the other end being the repository hosted at dmz06.rz.hft-stuttgart.de. If not already installed, please ask Nazmul for an account and detailed instructions on how to create this tunnel via PuTTY on Windows.
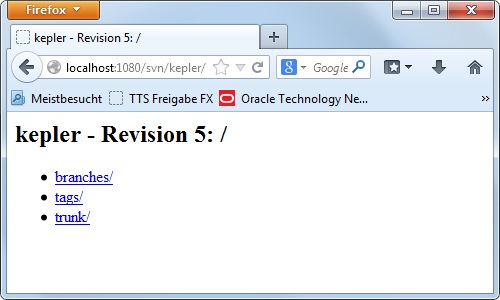
Establish a secure connection with PuTTY. (This means that open Putty, double click on Named-server(the serve you have named in Putty), then you are asked for your username and the password that you have used when generated the putty key.) Test it by opening http://localhost:1080/svn/kepler/trunk/ in your browser and providing your credentials to access the Subversion repository. The result should look like this:
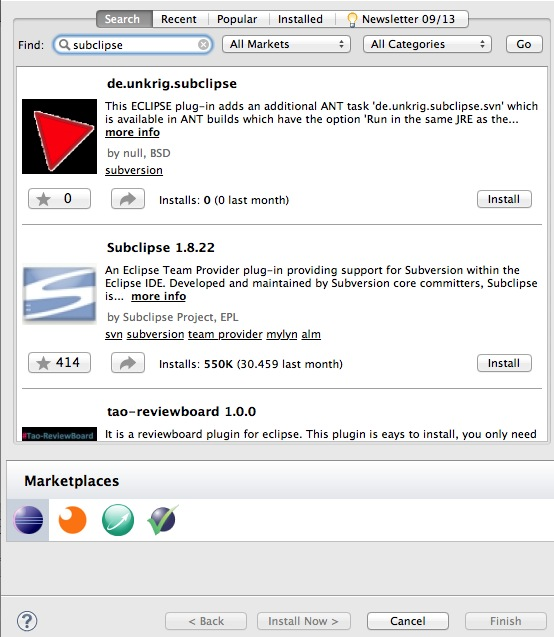
Now it's time to install and configure the Eclipse Subversion plugin for Eclipse, which is either "Subversive" or "Subclipse". We go with the latter. Open dialog Help -> Eclipse Marketplace … and type "Subclipse" in the search field.
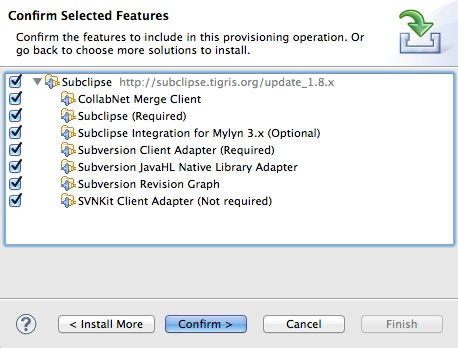
Press Install and select the components to be installed like here:
Accept a license agreement for Subclipse and, then, let the software install and restart Eclipse when asked for.
[edit] Checkout projects
You can skip this section, if you have upgraded an old SImStadt Eclipse workspace. In this case, the projects exist already and there is no need to check them out again.
Open the dialog for new projects File -> New -> Project… and perform the following steps:
- Choose SVN -> Checkout projects from SVN and click "Next >"
- Check "Create a new repository location" and click "Next >"
- Provide "http://localhost:1080/svn/kepler" as the repositories loaction and click "Next >"
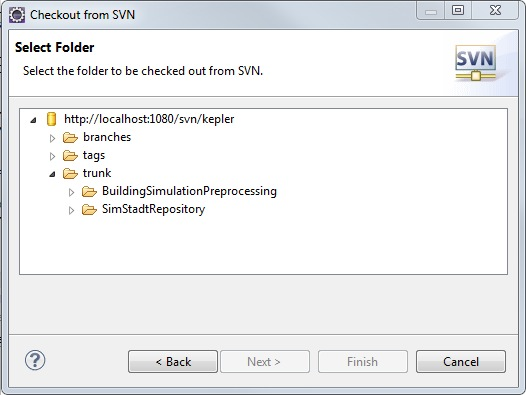
- Under "trunk" select all projects for checkout and click "Next >" . Note: you need to select all projects under "trunk" by keeping control or shift key. If you choose the heading folder, "trunk", the sub-heading projects can not be recognized later on. Then it asks you several times for your username and password, do not worry!!! Just keep entering your data as long as it asks, or alternatively check the save password box
- Choose "Check out out into the workspace as projects" and click "Finish"
Here is the current list of projects (as of 28th of November, 2015):
- BuildingLibrary
- BuildingSimulationPreprocessing
- BuildingSimulator
- DistrictGraph
- EnergyADEPlugin
- GeometricPreprocessing
- InterfaceTools
- MonthlyEnergyBalanceWebService
- RadiationProcessor
- RegionChooser
- ShadowProcessing
- SimStadtFrontend
- SimStadtRepository
- SimStadtWebServices
- SimStadtWorkflowsEnergy
- SimStadtWorkflowsShadowing
- SimulationsRunner
- TestRepository (no code, but test data only)
- WeatherProcessing
Note that project configurations, namely the "invisible" directories and files .settings, .classpath and .project, are also correct and up to date since they are under version control, too. So, be careful changing any project settings, since these will make their way into our repository with your next commit and, thus, be shared by all developers. Some of the project settings we use are:
- Resource (Both, "Text file encoding" and "New text file line delimiter" should be set to "Inherited from container" as "UTF-8" and "Windows" line delimiter
- Builders
- Java Build Path
To inspect these settings, right click the project and choose "Properties"
Within BuildingLibrary there is one last configuration file that must be imported manually (applies only for new - not upgraded - SimStadt Eclipse workspaces):
- Go to File -> Import -> XML -> XML Catalog and click "Next >"
- In the upcoming dialog navigate to BuildingLibrary/src/defaultDataAndMappings/XMLCatalog.xml and click on "Finish"
This catalog stores the locations of the XML schema files defined in the SimStadt workspace and their associated namespaces. Given this information the user can manually validate XML files within the Eclipse.
[edit] Run SimStadt from Eclipse
In order to run SimStadt, you need to create, and sometimes update, an Eclipse runtime configuration:
- Go to dialog Run -> Run Configurations...
- Select node "Java Application" in the tree list. If a launch configuration already exists go to step 3. Otherwise create a new launch configuration by pressing the top-left button "New launch configuration". Fill out the form on the right with an appropriate name for the new configuration, e.g. "SimStadtApp", and select eu.simstadt.desktop.SimStadtApp of project "SimStadtFrontend" as its main class.
- Since workflows are added to the application via a plug-in mechanism, they are not recognized at compile time, but must be added to the runtime classpath. Deployment of SimStadt releases takes care of this, but to run SimStadt in Eclipse, we must add the workflow projects to the class path of your SimStadt run configuration manually:
- Choose tab Classpath in the right pane and press button "Restore Default Entries"
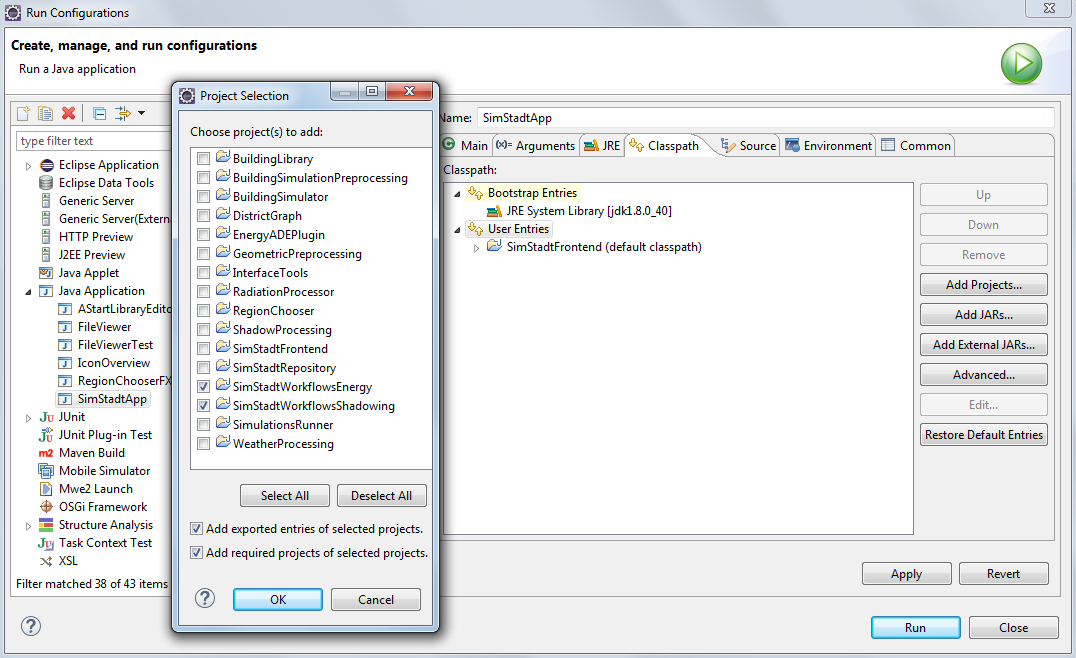
- Select "User Entries", Press "Add Projects..."
- In the upcoming dialog select workflow projects like "SimStadtWorkflowsEnergy" and "SimStadtWorkflowsShadowing". Make sure that options "Add exported entries of selected projects." and "Add required projects of selected projects." are selected and press "Ok"
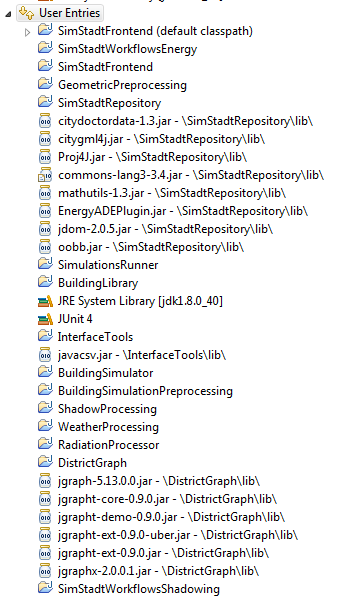
The result should look like this:
[edit] Test projects with JUnit
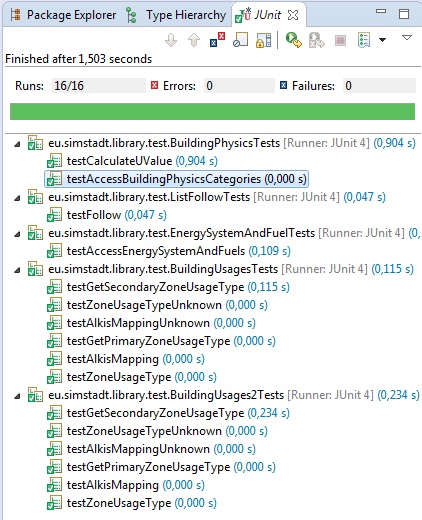
All projects (that is SimStadt components or modules) are configured to be testet with JUnit 4. For example, you can test the functions to read the building physics library from an xml file and convert them into Java objects by right click over folder test in project BuildingLibrary and execute "Run as -> JUnit Test". The result should be a report in the JUnit pane indicating which test cases have passed and which did not work as expected:
[edit] Writing Tests
Here some hints about writing useful tests for SimStadt:
- Avoid printing to the console. Usually test results are derived automatically, not due inspection by the human eye.
- Tests should not rely on our global test data repository (project TestRepository), since these data shall only be used for manual testing our applications.
- Naming:
- Tests for classes in package xx.yy.zz (located in source directory "src") should always reside in the same package xx.yy.zz, but under the different source directory "test". These test sources are skipped when deploying.
- Classes containing tests should be named XxxYyyTest, where XxxYyy may be (but must not be) the class tested
- Test methods should be named according to [name of the tested method or feature]_[expected input / tested state]_[expected behavior]. Exceptionally, underscore is allowed. For example, a unit test for a registerNewUserAccount() method which could be named as: registerNewUserAccount_ExistingEmailAddressGiven_ShouldThrowException(). Note that the examples in the picture above doesn't follow this rule.
- Use mechanisms built into JUnit to create (and automatically clean up) temporary files and directories like so:
@ClassRule
public TemporaryFolder tmpRepoDir = new TemporaryFolder();
[edit] Install Eclipse support for developing JavaFX applications
JavaFX is the actual technology to implement GUIs in Java. Since Java 8, JavaFX (also version 8) is part of the JRE. Therefore, if you just want to execute JavaFX programs, e.g. the SimStadt client, you can do so without any further ado. However, if you intent to work with code of a JavaFX application, you have to install one or two more components:
- Eclipse tooling for JavaFX
- SceneBuilder (only for GUI design and programming)
[edit] Eclipse tooling for JavaFX
The tools to develop JavaFX applications with Eclipse are provided here: http://www.eclipse.org/efxclipse/install.html. The current (November 2015) release of e(fx)clipse is 2.1.0.
To install e(fx)clipse tooling, follow the instructions "For the ambitious" — starting with step 3.
[edit] Scene Builder
Scene Builder is a stand alone application to create GUIs interactively and visually (as opposed by code). A stand-alone installer for Windows (64 Bit) of the latest release of SceneBuilder (currently 8.1.1) can be downloaded http://gluonhq.com/open-source/scene-builder/.
At last, in Eclipse choose Window -> Preferences -> JavaFX and specify the path to the Scene Builder executable, something like C:\Users\<username>\AppData\Local\SceneBuilder\SceneBuilder.exe.
[edit] Code Analysis with STAN
STAN is a useful tool to get metrics and structure information about Software in general and SimStadt specifically. Installation instructions for an Eclipse plugin are available at: http://stan4j.com/general/download-ide.html.
